XCode Playground Part IV: SpriteKit (2D game engine)

In the last part of the XCode Playground Series I demonstrate how use it with SpriteKit. It’s very simple to test animations and physics outside of your project.

But as mentioned in the last Part, the performance isn’t very good. Adding too much nodes or complex physics will lower the FPS rate extremly.

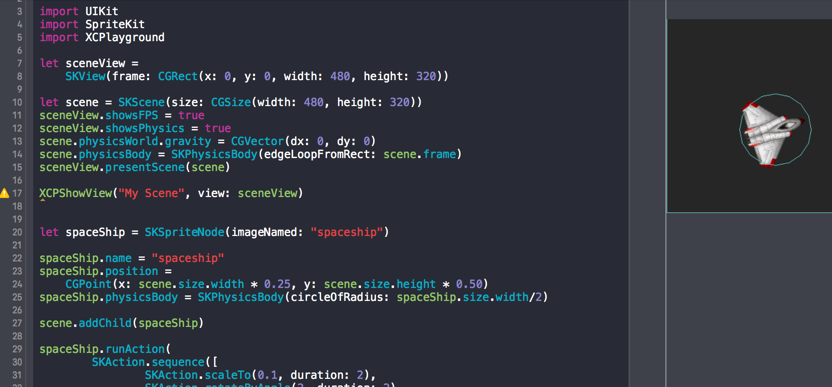
But let’s have a look how you can use it:

You find the source code here: https://github.com/zs40x/XCodePlayground_BlogSeries/blob/master/Part_IV.playground/Contents.swift

If you have a Mac, install Xcode and give it a try!

Xcode Playground Part III: Behind the Scenes

The Xcode Playground is an interactive REPL (Read-Eval-Print-Loop).

While you’re editing the code, Xcode executes, interprets and displays the results in the different views (timeline, result and console).

You can use the Swift interpreter from the command line:

There are also online interpreters like SwiftStub.com.

All-in-all the Playground coding experience is extremely interactive and feels like magic.
But this comes at the cost of performance. Complex or computing-intensive scripts run laggy. Even in the current XCode 7.1 release I regularly encounter errors that require an XCode restart.

But that’s okay!

For learning & testing this is acceptable and in many cases a better choice then a usual test project. I use it also for SpritKit test’s wich I demo in the next and last Episode of the XCode Playground series.

Links
Introduction to the Swift(Apple)
SwiftStub.com (online Swift Interpreter)

XCode Playground Part I: Diagrams

I really like developing with Swift for iOS for fun. With Xcode 6 (and Swift) Apple included the Concept of Playgrounds for learning, testing and so on. Coding in a Playground is interactive, per Default Xcode builds automatically while you change the code.

Playground are very simple, but also powerful. Over the next Weeks I’ll demonstrate other cool Playground Features.

Playground with 2 DiagramsLet’s have a look at the Diagrams:
In my 2 Examples I use loops and Playground tracks the variable Changes. If you use “print” the Console Output would be displayed, but to use the Diagram we just need an Variable as single Statement or an Operation as you see in the second Example.

I made a short Video to demonstrate how to open the Diagram. Note that the diagram gets updated instantaneously after changing the code!